How-To Videos
Lawn Care Tips
Q & As
Blog
Have a Question?
No green thumb? No problem!
Caring for your landscape plants in a proper manner will bring you years of enjoyment.
Properly cared for plants will:
- Be more vigorous.
- Look better.
- Live longer.
- Be a great accent.
- Flower more.
- Give you years of enjoyment.


Planting Tips
Handling Plants
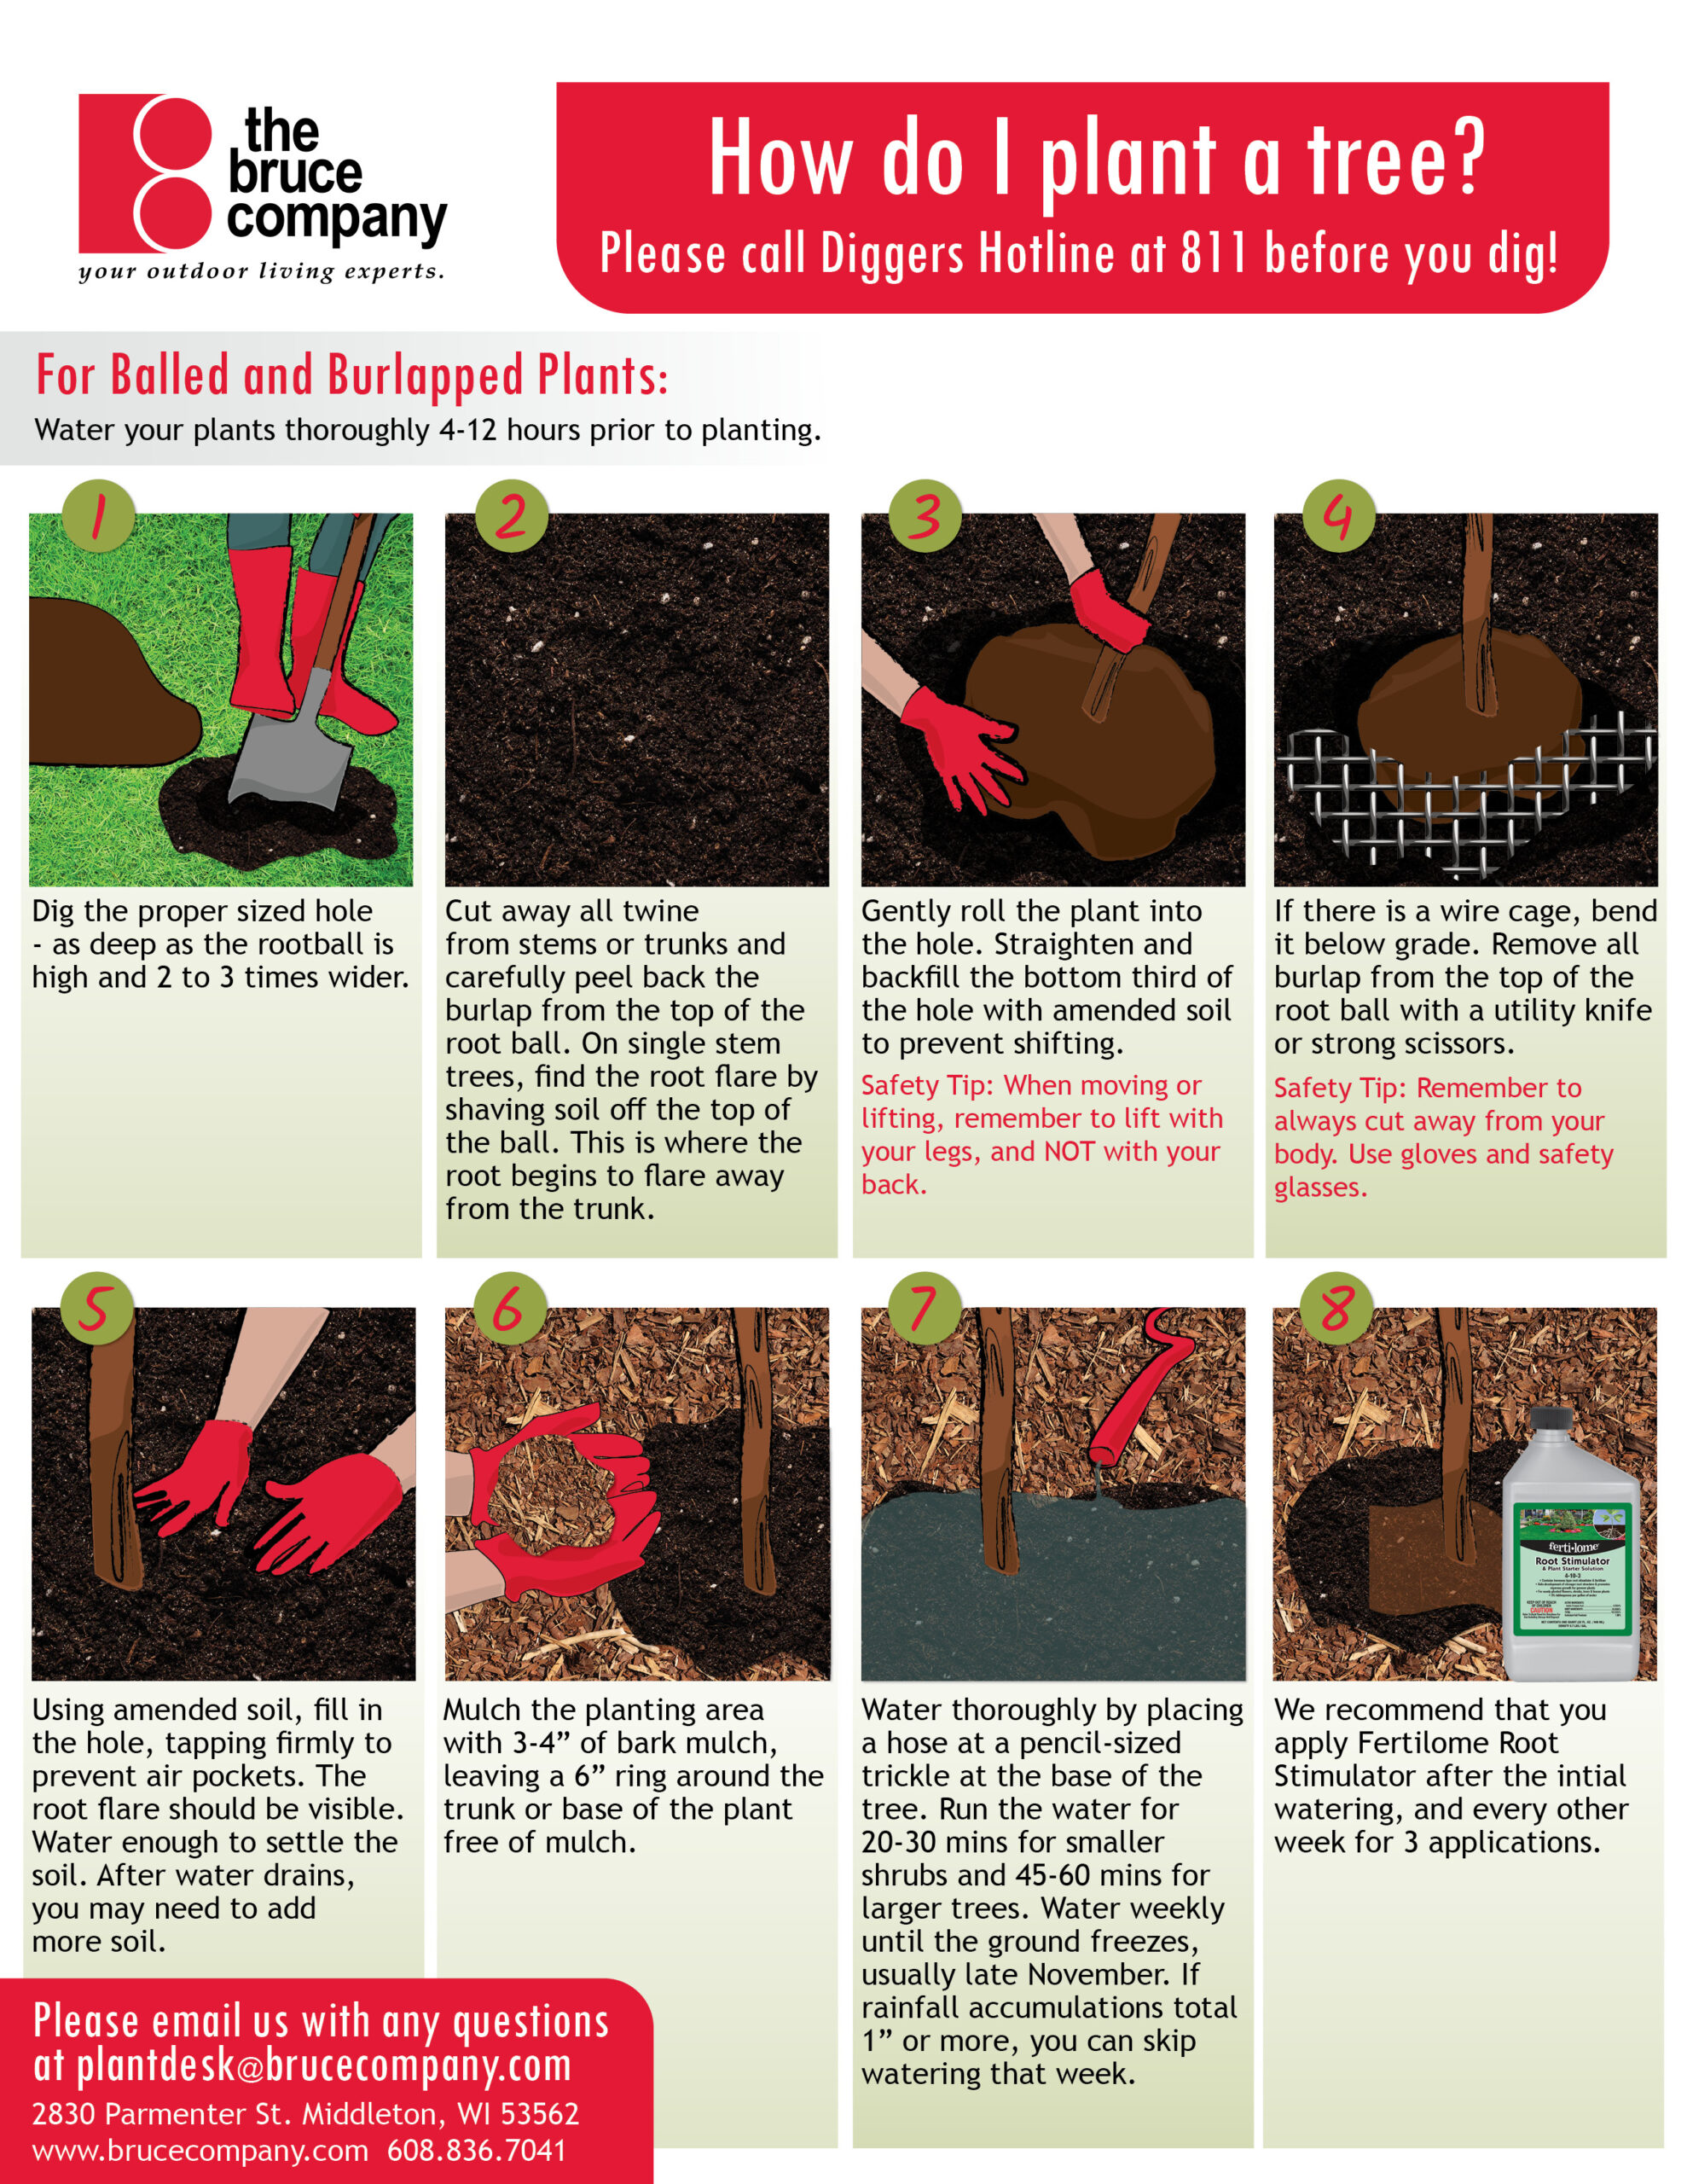
Pick up and carry your plant by grasping the container or root ball. Do not lift by the foliage or branches. Damage from poor handling shows up at a later date. Do not drop, as root damage can occur. Plant as soon as possible from the time of purchase. If you have to delay planting, keep container or root ball well watered to keep the roots from drying out. If possible, keep the plant in some shade until you plant it.
Digging a Hole for Planting
Dig a hole the same depth as the root ball and at least 6” wider than the root ball or container at the bottom and widening at the top. If the edges of the hole appear smooth and shiny after digging, roughen them with a shovel. When planting large shade trees or evergreens with heavy root balls do not loosen the soil below the root ball to prevent settling. Plants should be planted at the same depth that they were growing at in the nursery.
Removing Plant Container
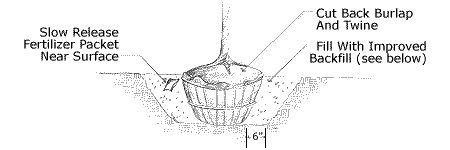
If grown in a plastic container, you should be able to gently grasp the plant by the base and pull it out of its container. If the soil or root ball appears to be breaking apart, then it would be better to cut the bottom from the pot and set the bottomless plant and pot into the planting hole. Then cut the side of the pot and remove it. If buying a plant with a paper Mache pot, leave it in the pot, tearing the top off down to the top of the roots and punch holes in the sides to improve water exchange and to speed up the decomposition of the pot. Burlapped root balls should remain intact until positioned in the hole. After positioning, cut all twine and burlap from the top 1/3 of the ball unless roots are already growing through. In this case, cut the twine and burlap that readily pulls away from the root ball. Remove the top of the wire basket to prevent stabilizing roots intertwining with the wire.
Improving the Soil
Backfilling
Acid-Loving Plants
Rhododendrons, Azaleas, Hollies, Bayberry, Stephanandra, Blueberries, etc.
Acid-loving plants require additional site preparation. To create a planting bed for acid-loving plants, add 4 – 6″ peat moss and 2 -3 lbs. granular sulfur/100 square feet of area. Work the peat and sulfur into the soil, creating a slightly raised bed with increased drainage and a lowered pH.
Mulch the Planting Site
A 2-3″ layer of mulch will reduce weed competition and soil compaction, prevent mower injury, and will create the cool moist conditions that plant roots require. Avoid piling mulch up on the tree or shrub stems. Try to taper the mulch to a very thin layer at the trunk or stems.
Tree Staking
Do Not Prune!
Transplant Shock
Your plant will likely not show great growth the first 2 to 3 years as it puts its energy into root growth. The leaves may be smaller and sparser than you would expect and it probably won’t bloom very strongly, if it all. Please resist the urge to over fertilize. You may get resulting top growth from fertilizing, but it may actually be detrimental to the root system and the plant as a whole. Products that specifically stimulate root growth have been beneficial during this time or root regeneration.
Patience is the best approach as you let your plant adapt to its new home. Always feel free to call either the retail nursery or landscape sales office with your questions or concerns at 608-836-7041.
Pruning Tips
PRUNING SHRUBS
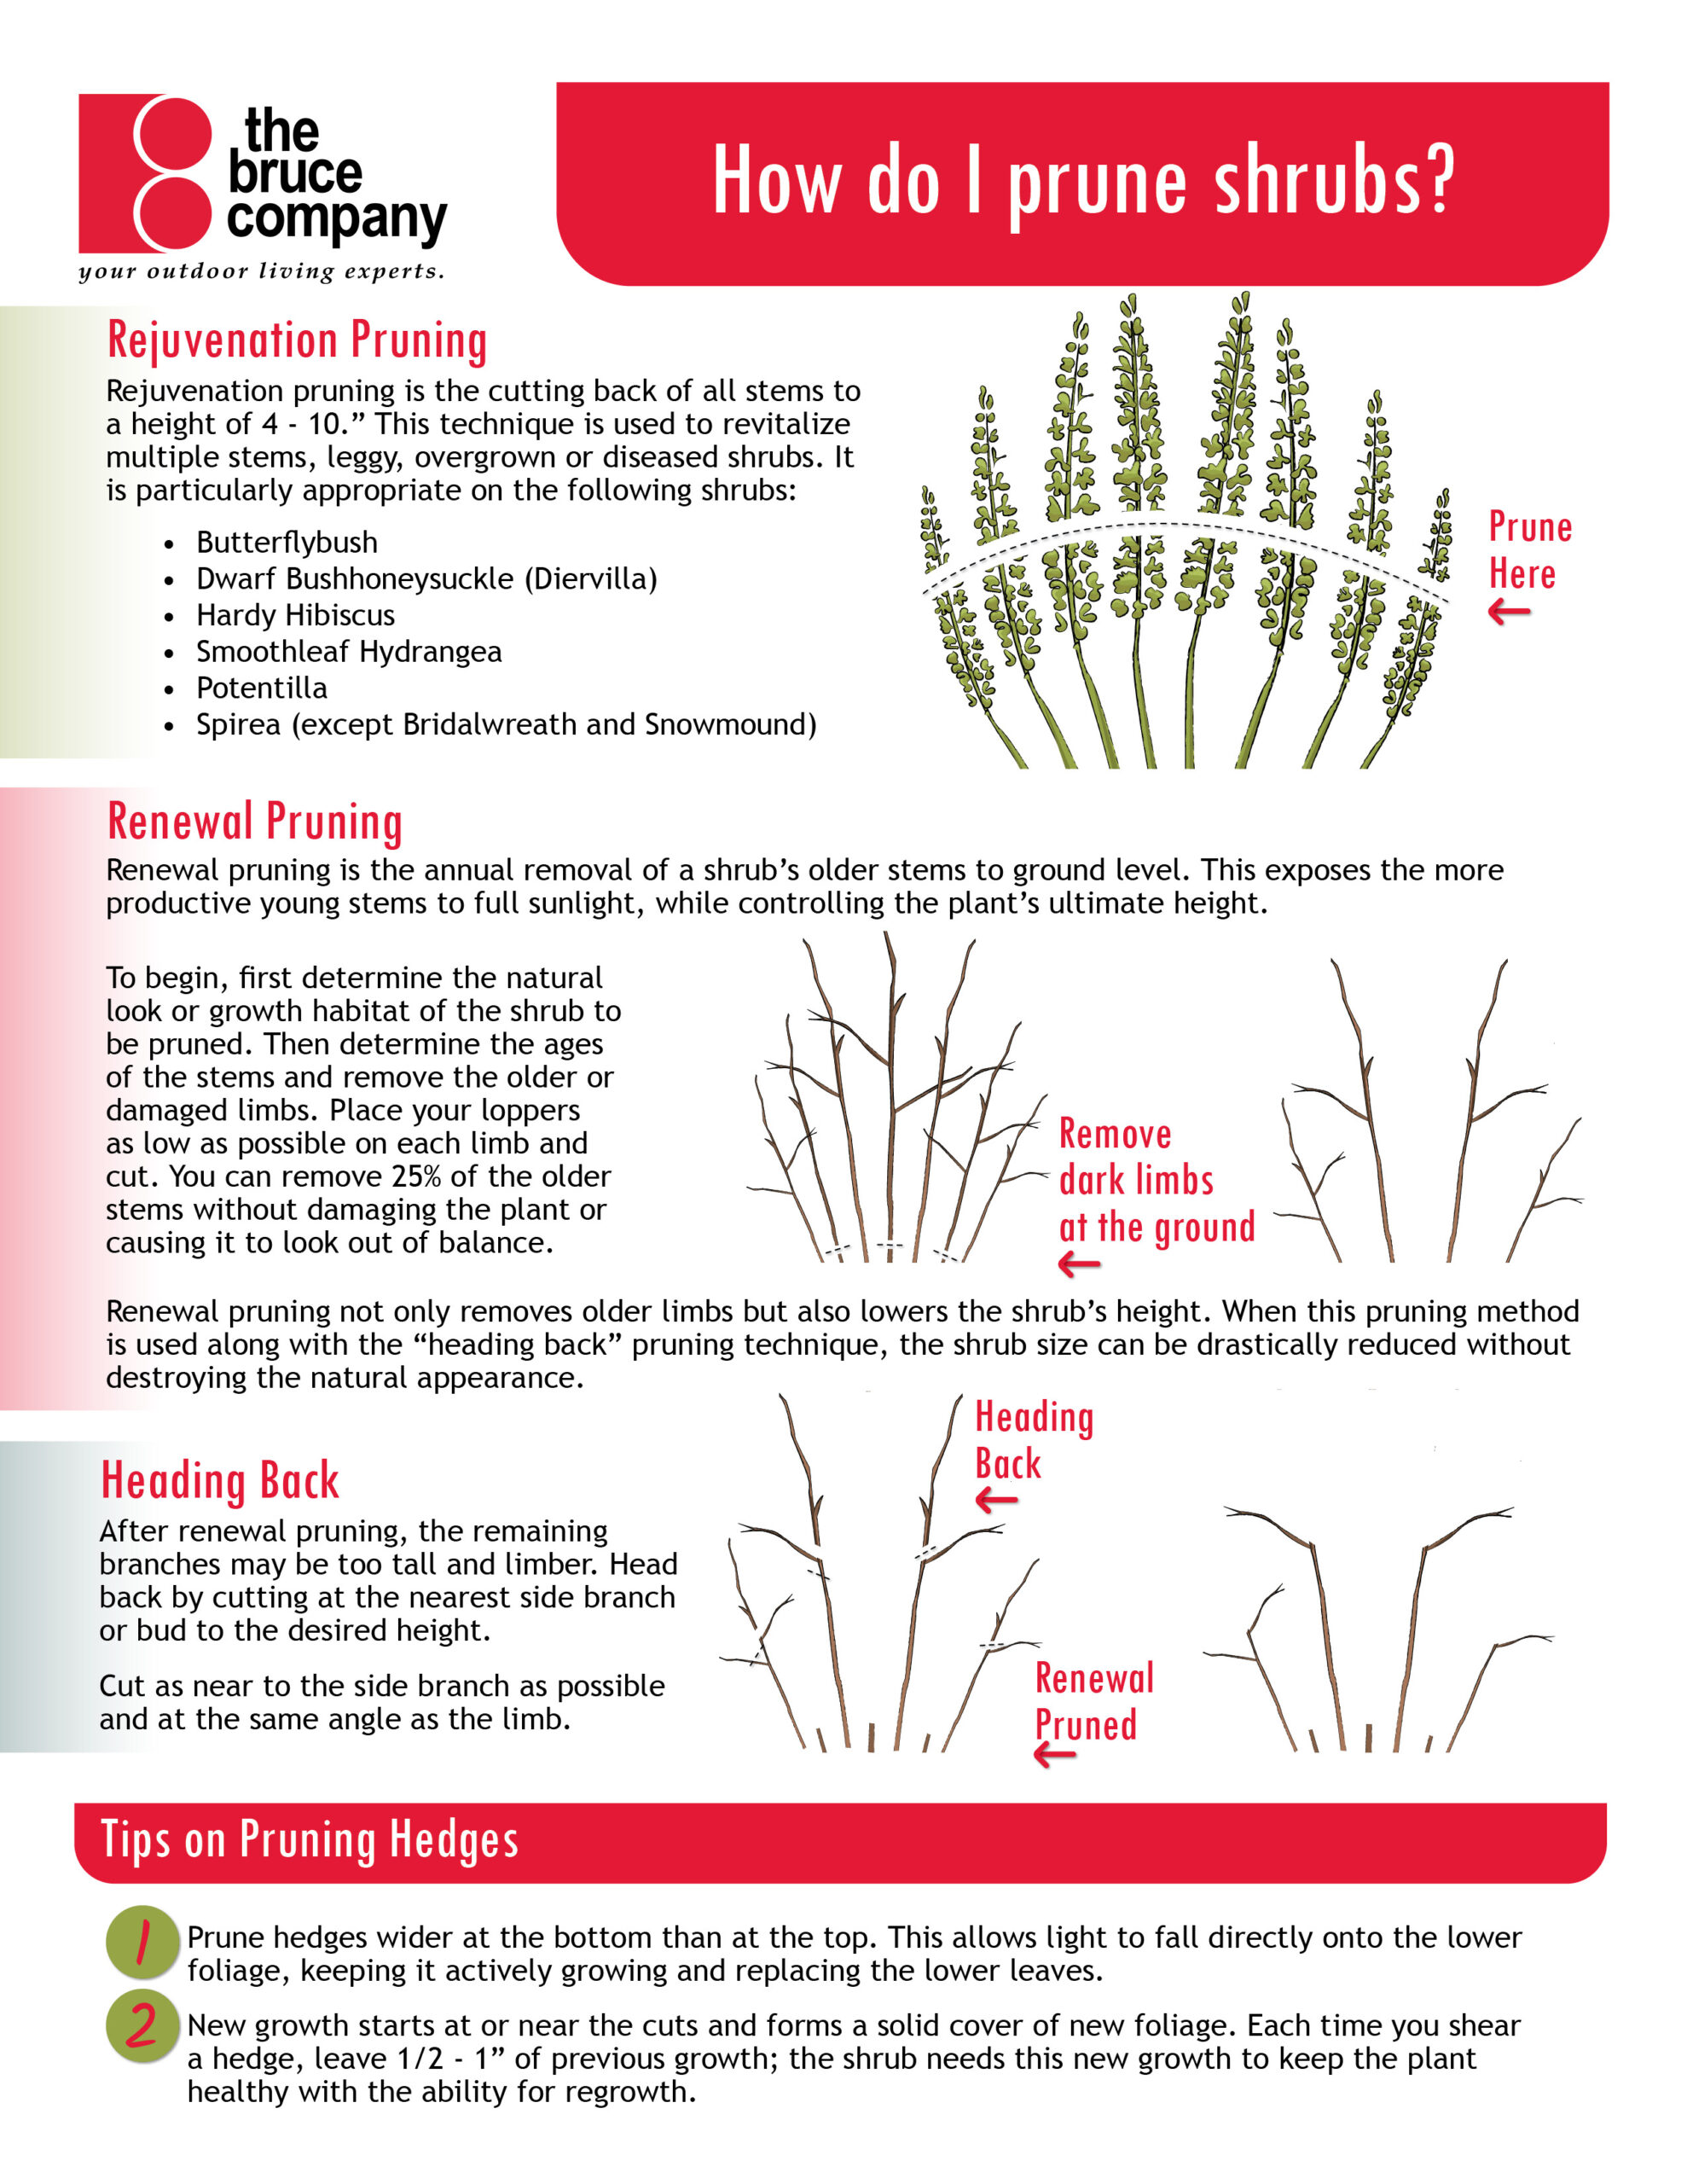
Rejuvenation Pruning
Rejuvenation pruning is the cutting back of all stems to a height of 4-10″. This technique is used to revitalize leggy, overgrown or diseased shrubs. It is particularly appropriate on the following shrubs:
- Dwarf Bushhoneysuckle (Diervilla)
- Hydrangea -Annabelle
- Potentilla
- Spirea (Except Bridalwreath and Snowmound)
Some shrubs dieback to the ground each winter. Remove all above ground foliage from these plants:
- Butterfly Bush
- Caryopteris
- Lavender
Renewal Pruning
Renewal pruning is the annual or semiannual removal of a shrub’s older stems to ground level. This exposes the more productive young stems to full sunlight, while controlling the plant’s ultimate height.
To begin, first determine the natural look or growth habit of the shrub to be pruned. Then, determine the age of the stems and remove the older or damaged limbs. Place your loppers as low as possible on each limb and cut. Remove all of the older stems possible without damaging the plant or causing it to look out of balance.
Renewal pruning not only removes older limbs but also lowers the shrub’s height. When this pruning method is used along with the “heading back” pruning technique, the shrub size can be drastically reduced without destroying the natural appearance.
Heading Back
After renewal pruning, the remaining branches may be too tall and limber. Head back by cutting at the nearest limb to the desired height. Cut as near to the side branch as possible and at the same angle as the limb.
Tips on Pruning Hedges
Prune hedges wider at the bottom than at the top. This allows light to fall directly onto the lower foliage, keeping it actively growing and replacing the lower leaves.
New growth starts at or near the cuts and forms a solid cover of new foliage. Each time you shear a hedge, leave 1/2-1″ of previous growth; the shrub needs this new growth to keep the plant healthy with the ability for regrowth.
Spring Flowering Shrubs and Ornamental Trees
|
|
|
Summer Flowering Shrubs
|
|
|
PRUNING TREES
Proper pruning enhances the beauty and natural form and benefits the health of trees. Consider the limitations of the planting site and select trees with the right size and shape.
Pruning Young Shade and Ornamental Trees
Your trees were pruned while growing in the nursery. Limit your pruning as much as possible on a newly transplanted tree because the foliage helps to photosynthesize food necessary for the tree’s growth. After your tree is established, the pruning you do should take into consideration the natural growth habit of your tree. Start pruning when the tree is developing its crown and you will be rewarded with a healthy, attractive tree.
Branches that should be removed from trees:
- Eliminate double leader.
- Remove dead or dying branches.
- Remove crossing branches that are rubbing and damaging bark. Open wounds attract insects and diseases.
- Remove water sprouts (strongly upward growing branches common on flowering Crabapples), and suckers (vigorous shoots that originate at the base of the trunk, from the roots.)
Timing
Do NOT Top Trees!
– Dr. Robert Miller, UW-Stevens Point
Cost
No Flush Cuts
Sometimes larger branches must be removed from mature trees. Branches up to 4-5 inches can be removed but call in a certified arborist if the limb in question is especially heavy, too high, or hanging over electrical wires, a building, or a fence that could be damaged when it falls.
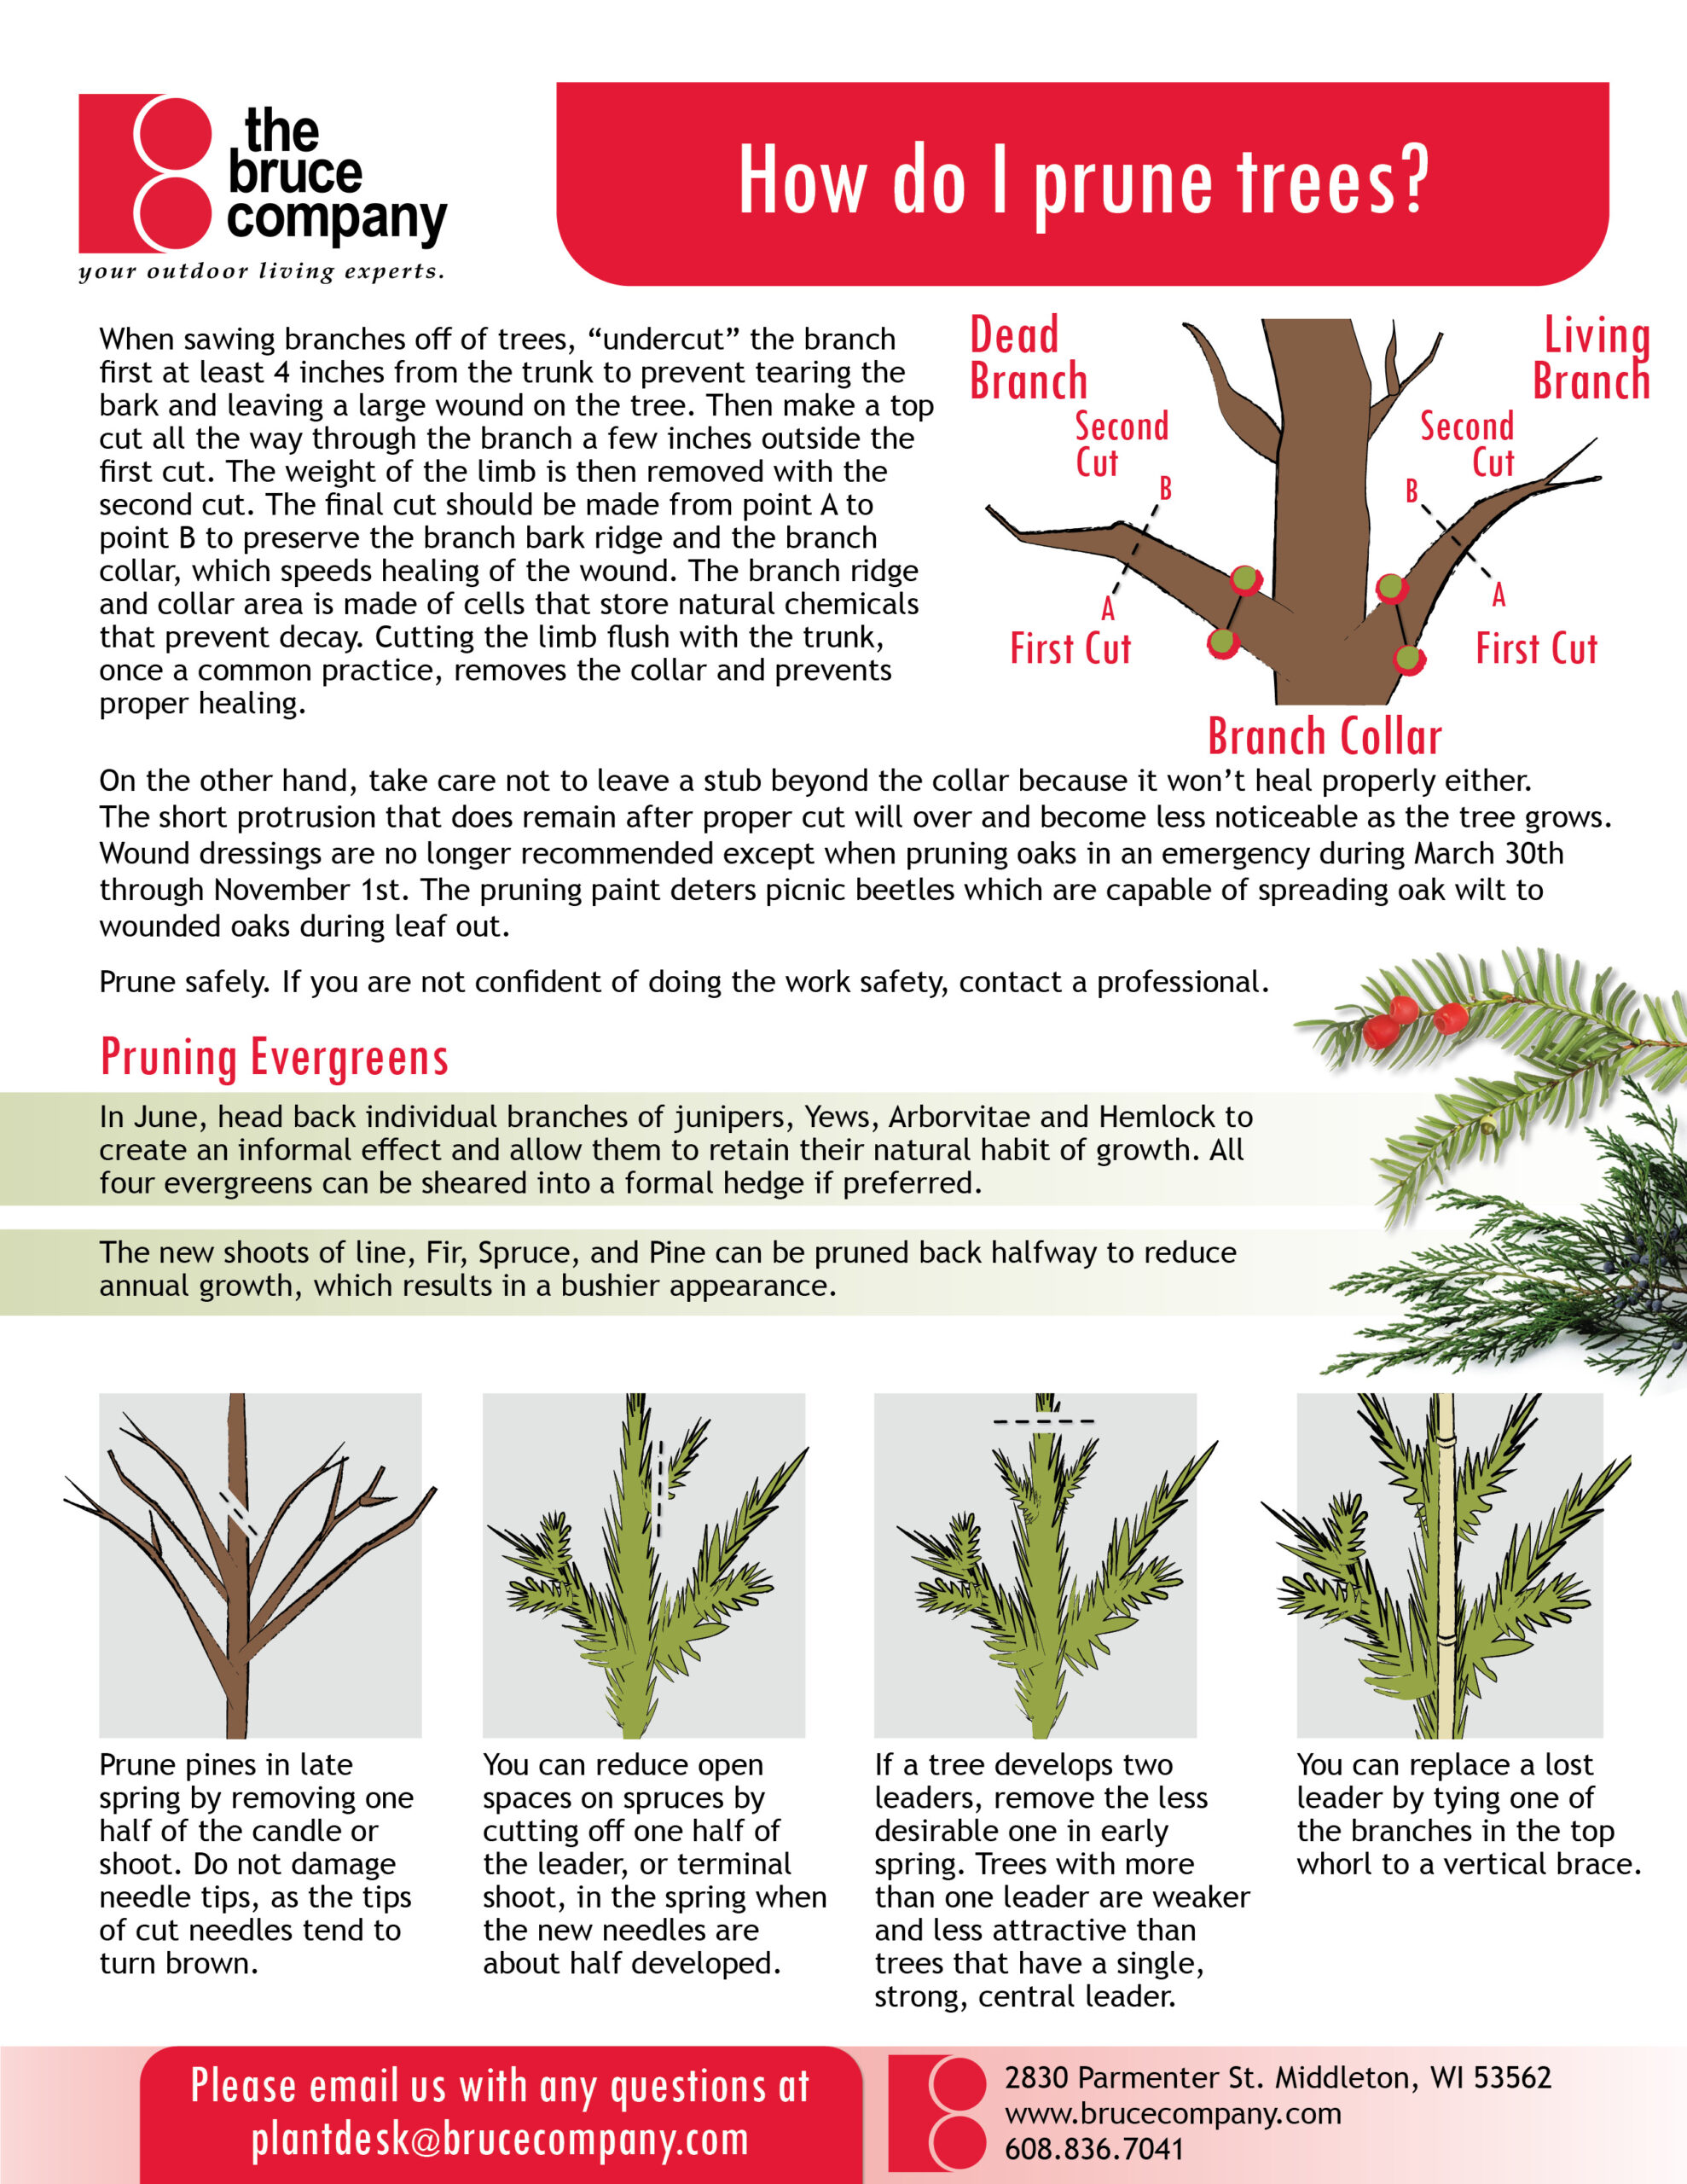
When sawing branches off of trees, “undercut” the branch first at least 4 inches from the trunk to prevent tearing the bark and leaving a large wound on the tree. Then make a top cut all the way through the branch a few inches outside the first cut. The weight of the limb is then removed with the second cut. The final cut should be made from point A to point B to preserve the branch bark ridge and the branch collar, which speeds healing of the wound. The branch ridge and collar area are made of cells that store natural chemicals that prevent decay. Cutting the limb flush with the trunk, once a common practice, removes the collar and prevents proper healing. On the other hand, take care not to leave a stub beyond the collar because it won’t heal properly either. The short protrusion that does remain after a proper cut will callus over and become less noticeable as the trunk grows. Wound dressings are no longer recommended except when pruning oaks in an emergency during April 15-September 15. The pruning paint deters picnic beetles which are capable of spreading oak wilt to wounded oaks during leaf out. Prune safely. If you are not confident of doing the work safely, contact a professional arborist or your Bruce Company representative.
Evergreens
In June, head back individual branches of Junipers, Yews, Arborvitae, and Hemlock to create an informal effect and allow them to retain their natural habit of growth. All four evergreens can be sheared into a formal hedge if preferred.
The new shoots of Pine, Fir and Spruce can be pruned back halfway to reduce annual growth, which results in a bushier appearance.
Prune pines in late spring by removing one half of the “candle” or new shoot. Do not damage needle tips, as the tips of cut needles tend to turn brown.
To reduce open spaces on spruces, cut off one half of the leader, or terminal shoot, in the spring when the new needles are about half developed.
If a tree develops two leaders, remove the less desirable one in early spring. Trees with more than one leader are weaker and less attractive than trees that have a single, strong, central leader.
You can replace a lost leader by tying one of the branches in the top whorl to a vertical brace.
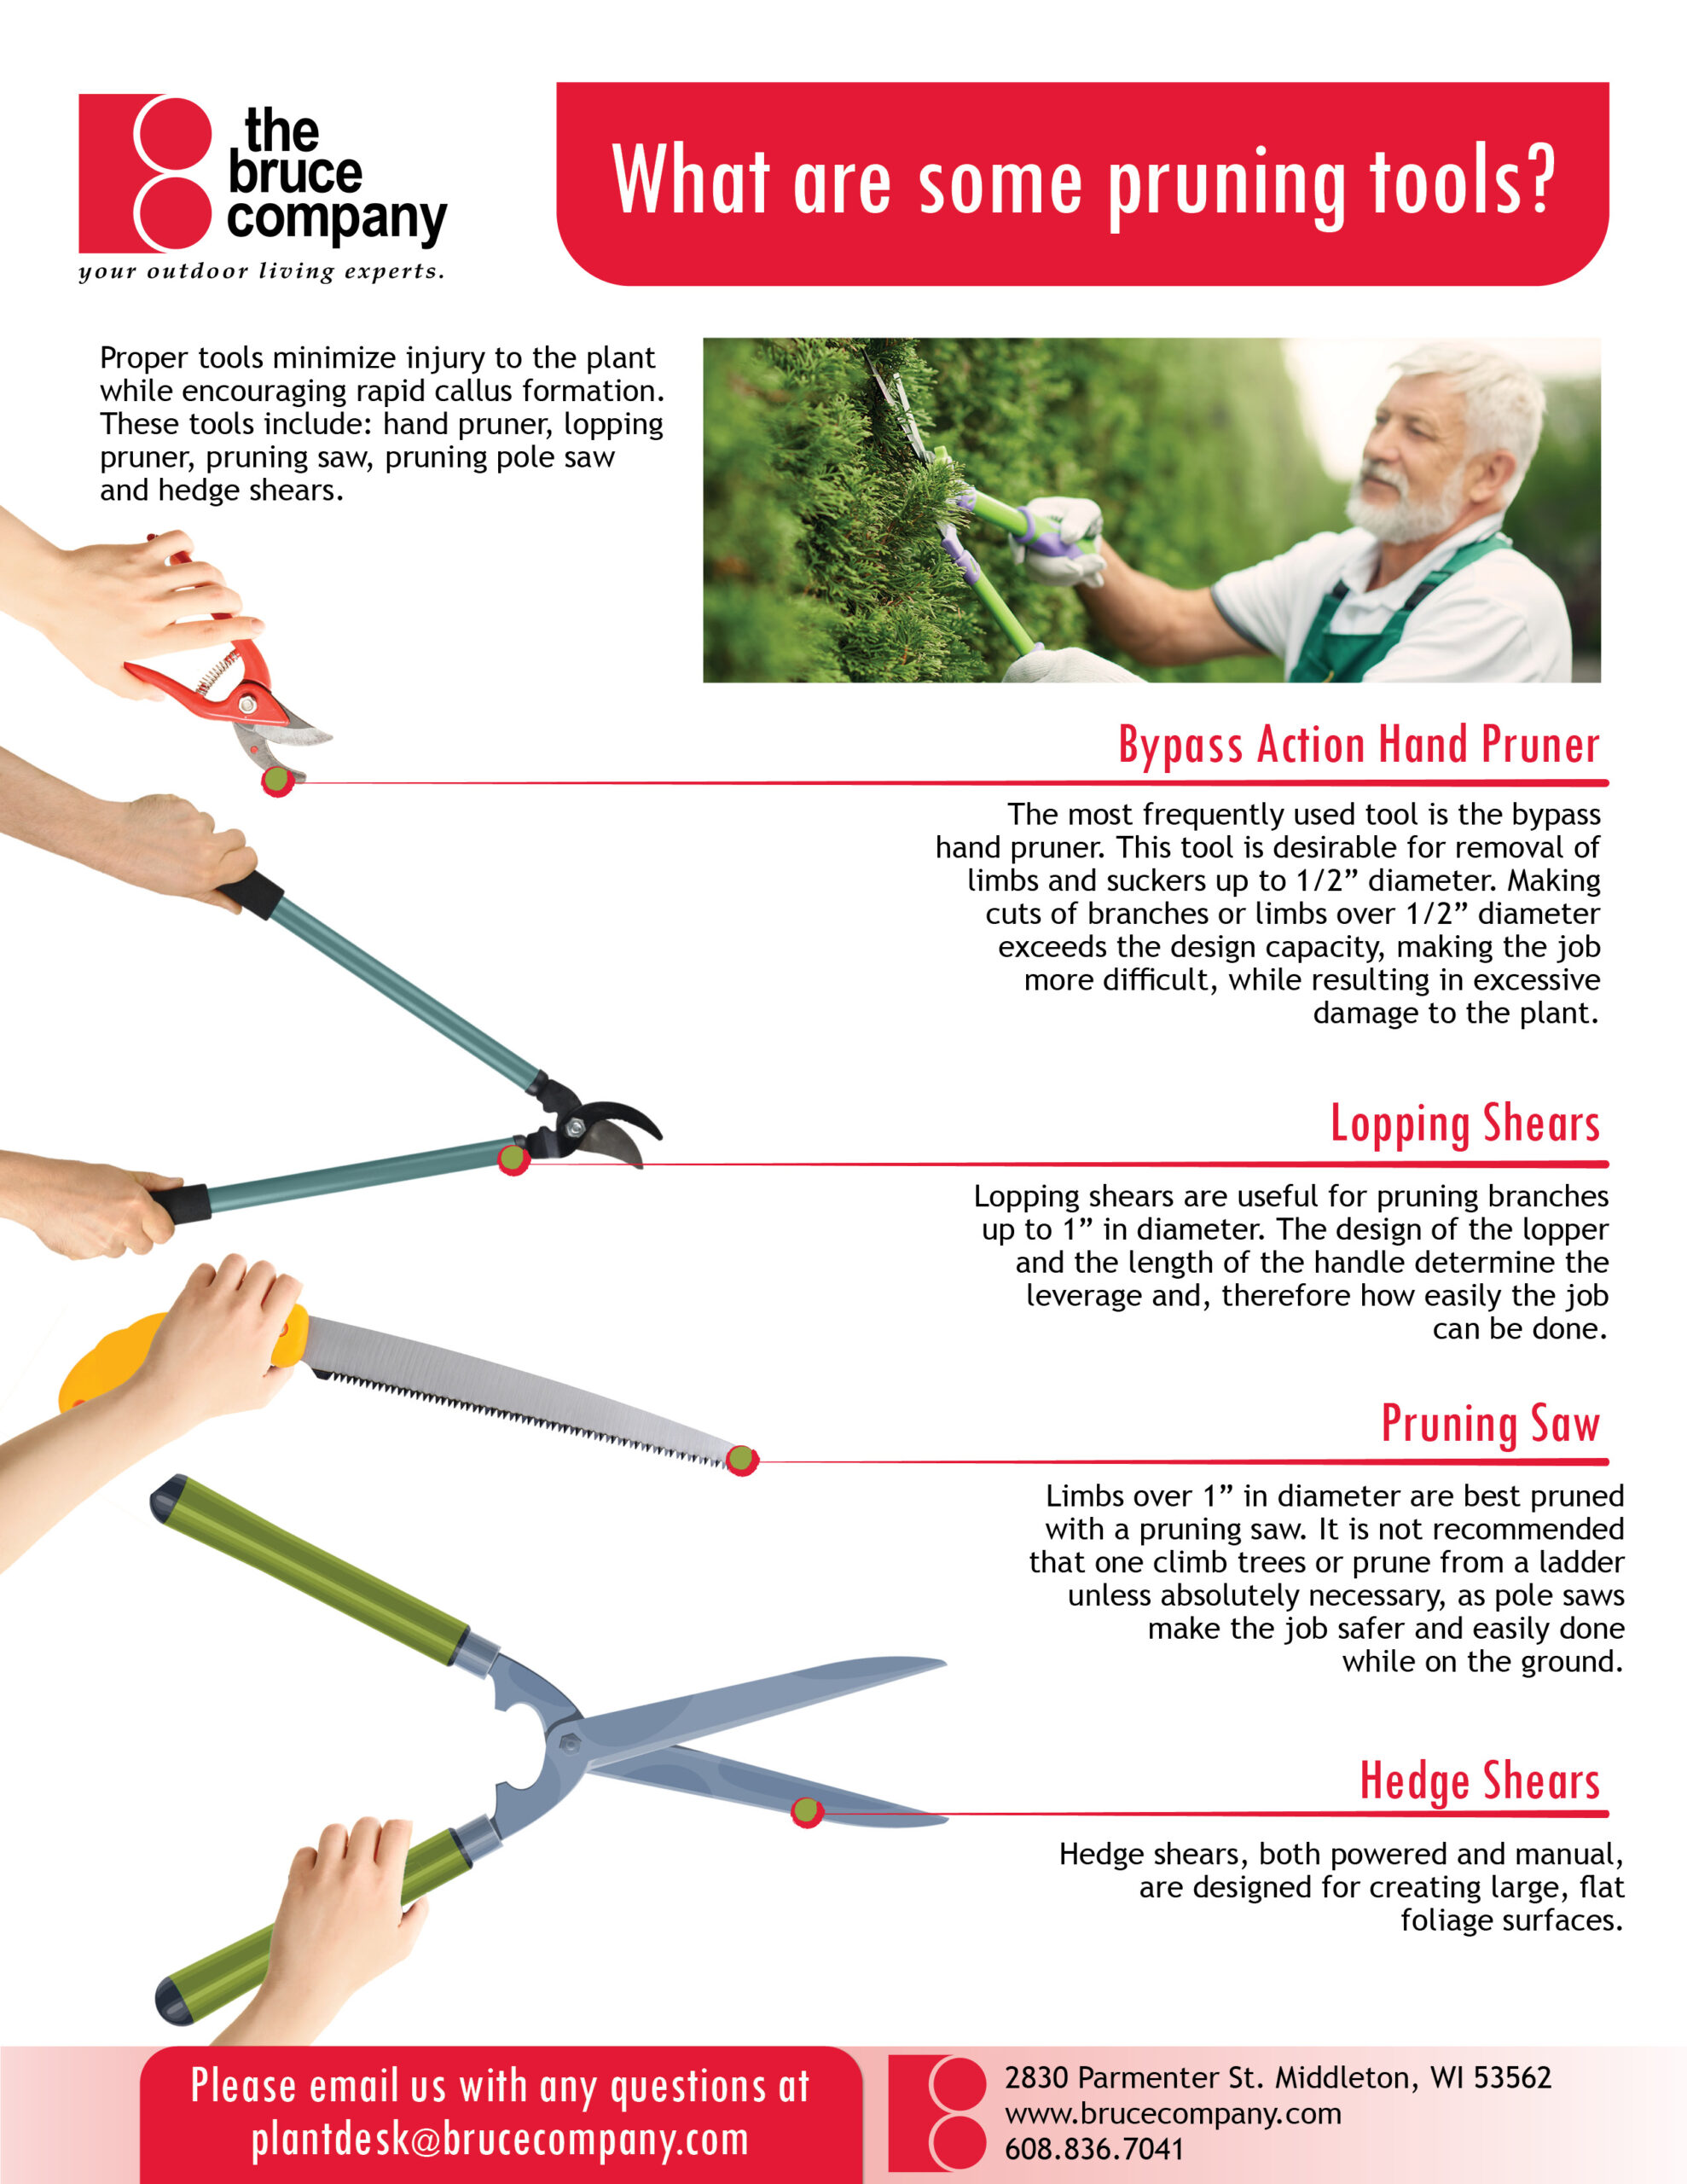
Tools for Pruning
The most frequently used tool is the scissors action hand pruner, a tool desirable for removal of limbs and suckers up to 1/2″ diameter. Cutting branches or limbs over 1/2″ diameter makes the job more difficult and results in excessive damage to the plant.
Lopping shears are useful for pruning branches over 1/2″ in diameter. The design of the lopper and the length of the handle determine the leverage and, therefore, how easily the job can be done.
Limbs over 1″ in diameter are best pruned with a pruning saw. It is not recommended that one climb trees or prune from a ladder unless absolutely necessary. Pole saws make the job safe and easy from the ground.
Hedge shears, both powered and manual, are designed for creating large, flat foliage surfaces.
Contact your Bruce Company representative regarding our full service landscape management services.
Perennials
Watering Perennials
When to Water
For the first month after the initial planting, you should water once or twice a week. However, this is dependent on the amount of rainfall.
How to Water
Watering should be done in the morning. Foliage should be dry before nightfall. Wet foliage makes the perennial more susceptible to disease organisms. Hand water or use a soaker hose. The hose should be laid out permanently in the bed. Although this may make it difficult to cultivate around, you will be disturbing the plants and beds less than with continued movement of a hose. Water at a low level, keeping the foliage as dry as possible.
Why Mulch?
Mulching has many positive benefits for your perennials. Mulching acts as a protective blanket for your perennial’s roots. It holds in moisture cooling the roots, reduces the need for watering, promotes root growth, enriching the soil as it decomposes as well as improving the soil structure. Mulch reduces the light reaching the soil surface which suppresses weed seed germination. If some weeds should happen to root themselves in the mulch, they are easier to pull.
How to Mulch
A 2-3″ thick layer should be maintained. However, don’t pack the mulch closely around the crown or base of the perennial. This could promote rotting. (Note: bearded iris prefer no mulch.)
When to Mulch
Immediately after planting the perennial, reapplying in early spring as needed.
Winter Protection
Why is this Necessary?
A winter cover helps keep the soil temperature from fluctuating over the winter months. This prevents the plants from being heaved out of the soil by the freeze/thaw cycle.
What Should be Covered?
• Newly planted perennials
• Shallow rooted perennials such as mums, shasta daisies and delphiniums
Non-matting materials such as: marsh hay, evergreen boughs, pine needles, leaves, straw.
How and When to Apply
Many sources recommend removing the dead foliage at the end of the growing season before you cover the perennials. It is thought that it may harbor disease and insects. If you enjoy seeing the attractive fruit/seed heads through the snow, you may want to leave the showier ones (like autumn joy sedum and ornamental grasses, etc.) intact. Some seeds are enjoyed by the birds that migrate through and that stay into the winter.
Generally around Thanksgiving or when the soil is thoroughly frozen to a depth of 2″, you may start covering. Caution, covering before this time is not recommended as it could provide a winter haven for rodents with your perennials a good source of food. You should check the perennials regularly to see if they have been disturbed by frost heave. If so, firm them back into the ground.
Remove the winter covering in early spring.
Fertilizer
Dividing Perennials
Why Divide?
After a few years, some perennials tend to lose vigor and need to be rejuvenated. Dividing is the best way to accomplish this. This can also be helpful if a particular perennial is getting too large for its garden space or if you would like to introduce this plant in another area of your yard. In general if a plant is growing well and not crowding, division is not necessary.
Most Perennials Can Be Divided
It is especially beneficial to divide iris, daylilies and lilies after 3 years. Coralbells (Heuchera) tend to grow out of the ground and so should be divided and replanted deeper. Some perennials can obtain a large spread while the center can often lose vigor and die out. To remedy this, cut a section out of the center, fill with new soil and plant a small division from the outside of the clump. Monarda is a good example of a plant that does this.
When to Divide
Early spring when the plants are only about 2-3″ high or in fall when the foliage starts to die back.
How to Divide
Division is made easier by watering the planting bed well a few days before you prune back the perennials (at least 6″ above the ground). Dig the entire clump out if possible. Pulling the clump apart is less stressful on the roots than severing them. For large clumps the technique often used is 2 pitchforks set back to back within the root ball then squeeze the handles together as you pry apart the roots. Add fertilizer to the hole and replant a portion of your division.
Staking, Pinching Back, Dead Heading
Staking
This is sometimes necessary for tall plants or plants in windy or shaded sites with rich soil. There are a variety of supports which can be used, depending on the weight and mass of the perennial to be supported. It is best to put the stake in place as soon as growth starts in the spring. Some staking can be avoided if enough perennials of similar or slightly smaller size are there to help support one another within the border.
Pinching Back
This is used to promote a bushier, shorter perennial. Tips of the growing shoots should be removed in May or June. Following are a few perennials which can be especially benefited by pinching back:
• Chrysanthemums
• Asters
• Obedient Plant (Physotegia)
• Border Phlox
This is removal of dead or spent blooms. It is mainly done for aesthetic reasons or to keep the perennial from setting seed. Perennials benefiting from this technique are:
• Coreopsis
• Daylilies
• Shasta Daisies
Roses
Before You Plant
Site
Before planting, check these requirements carefully to make sure your rose will be planted in the proper site.
Roses must have plenty of sun, at least 5-6 hours a day, preferably morning sun. Some afternoon shade is helpful. Providing good air circulation will help reduce fungal leaf diseases.
Avoid southwest exposures because of winds and excessive reflective heat. Try to avoid planting where the rose will be exposed to hot or dry winds.
Roses grow best in a fertile, well drained, slightly acidic (pH 6.0-6.5) soil.
Regular watering, especially during dry periods, will insure continuous flowering (on everblooming roses) during the main growing season. Roses should receive approximately 1″ of water per week.
Handling and Care Before Planting
Pick up and carry your rose only by grasping the container. Damage from dropping or throwing shows up at a later date. Replacement is expensive and unnecessary and should be prevented now.
It is important to plant as soon as weather permits. Early planting gives roots a chance to start growth before the tops leaf out.
Do not let the roots dry out. If you cannot plant right away because of weather conditions or time schedule, make sure the soil is moist in the container and place the plant in an area protected from winds.
Cold Weather Protection
Boxed roses purchased in early spring will benefit from protection when subfreezing temperatures inevitably occur. Roses can withstand different low temperatures depending on their stage of growth.
- Tight buds (buds just beginning to develop swelling) usually pink or white: 28° F.
- Tight leaf (leaves showing green but in a constricted form): 30° F.
- Full leaf (leaves open and distinguishable): 32.5° F.
- Full leaf with rosebuds beginning to develop will experience some leaf “browning” at 32° F you will lose some leaves although the plant should not die.
If storing boxed rose for planting later, be sure to water regularly and store in a cool place (32-40° F). Be sure to protect from low temperatures as mentioned above. If stored in a warm environment growth will occur and would best be planted after May 15, “traditional” frost free date in the Madison area.
If freezing is predicted, place them in a location safe from subfreezing temperatures.
Planting Roses
Dig the hole
For Individual Plant: Dig a hole big enough to allow roots to spread. Allow 1 foot wider and 6 inches deeper than the container the rose comes in.
Spacing
In foundation plantings, make sure the bushes are planted 2 feet from the building. Climbing roses should be planted 12-15 inches away from their intended support. Space climbing roses 4-5 feet apart on a wall, 6-8 feet on a trellis or fence. Tree roses need 3-5 feet between specimens. Hybrid teas, floribundas and grandifloras should be spaced about 2 feet apart. Miniature roses can be spaced approximately 18″ apart. Hardy shrub roses are highly variable in size; spacing will be determined by variety.
Improve Backfill Soil
Half the soil that was dug out of the hole will be used to backfill and should be improved with organic matter. Mix the soil with well rotted manure, compost or peat moss to a ratio of 1 part organic to 2 parts soil. This loosened, enriched mixture allows greater root development and easier root spread into the surrounding native soil.
Backfill 6 Inches and Set in Rose
Line the bottom of the hole with 6 inches of the improved backfill and place the container on top. Take off papier-mâché or cardboard containers if they appear to come away easily, otherwise punch holes in sides or slit lengthwise in many places to allow water exchange and more rapid breakdown of the paper. Cut away any paper that comes above the soil surface. The paper can act as a wick and dry out the root ball below. Plastic pots must be removed.
Planting Depth of Hybrid Tea Roses
Check to make sure bud union is 1-2 inches below ground level. In cold climates, it should be protected by remaining below the ground surface. In the future, be sure to cut off any suckers that come up from below the ground. Hardy Shrub Roses should be planted at the same depth as in the container.
Apply a Fertilizer
Add bone meal or a rose fertilizer to the planting hole. Roses are heavy users of fertilizer. As the season progresses, more fertilizer may be applied. Follow instructions on fertilizer label and spread evenly. Do not fertilize in the fall as it will stimulate new growth, delay hardening off, and winterkill will result. Fertilizer should also be kept away from the plant’s stems and leaves.
Fill in Hole
Fill to the top of the hole with improved backfill. Firm down. Do not trample, as it can break and injure the roots.
Water Well
Build a basin with soil to catch water. Run water slowly into the basin. This will help eliminate air pockets, settle soil and bring it into firm contact with the roots.
Early Spring Plant Protection
If planting in early spring, you may wish to mound loose garden soil 8-10 inches over the plant, or cover with your favorite method of protection. This can help protect the canes from late frost damage, temperature fluctuations, and drying winds.
Mulch
Apply a 3 inch mulch over the root area. Keep the mulch on the soil throughout the year. It will keep grass and weeds from competing with the rose for water and nutrients. Mulch will retain the much needed moisture that roses require.
Caring for Roses
Removing Blossoms
After blossoms fade, cut off the stem above an outward facing 5-leaflet leaf, making the cut at a 45° angle.
For cut flowers, cut only as much of the stem as needed. Cut at a 45° angle above an outward facing 5-leaflet leaf.
Winter Protection for Bush Roses
Hardy shrub roses on their own root need no winter protection. There are several methods that can be used to provide winter protection for tender roses.
Circle the rose with a rose collar or two foot high, 1/4″ wire mesh screen, after the ground freezes for the winter, usually around the end of November. Fill with dry leaves enough to cover canes to a height of 12″. If mice and voles are a problem in your area you may wish to consider placing waterproof poison grain in a rodent-accessible container at the base of the rose.
Another method involves mounding soil 8-10″ high around canes, in a rose collar after first hard frost, followed by evergreen boughs or marsh hay after the ground freezes.
Further protection may be afforded by a rose cone placed over the marsh hay and rose. In spring, remove rose cones or lids on warm days and replace at night. Then, after the last hard frost, remove cones, leaves and soil being careful not to damage any new shoots that might have started to grow while covered.
Watering Tips
Guidelines
It is important to water your plant material so you can protect your landscape investment.
Soil moisture levels, especially during sunny or windy weather, should be checked weekly once your plants are established. (See newly installed plants section regarding new installations)
One way to check the moisture content is to pull back the mulch and feel the earth. If the soil is compacted and you can’t penetrate the earth with your fingers, it is too dry and needs water immediately. If it is muddy, it is too wet, and you should wait a few days. If the soil is firm and moist enough to form a ball when it is squeezed (without water dripping), then breaks apart when poked, it’s time to water. If you are having a hard time determining the moisture level of your soil by look and feel, it may be worth investing in a hydrometer!
When watering, apply sufficient water so that the soil containing the roots is thoroughly soaked. When water starts to linger at the surface before draining down, that is enough. If the soil is hard and compacted (can’t penetrate with your fingertips), you may need to broadcast water slowly until it starts to absorb, followed by a good soak. Allow the soil to dry between watering so some air can penetrate the root area before watering again. Roots, like leaves, need oxygen. Too much continuous water eliminates oxygen from the soil structure and can cause rotting of the roots. Just how much water is required and how often depends upon the weather, soil conditions, the size, and variety of your plantings. As your plants mature, the root system goes deeper and deeper into the earth, requiring less and less maintenance.
Newly Installed Plants
Get to know your new plants! If there is no landscaping plan available, our garden center staff can help you identify your plants from photos! Watering can vary from one plant to the next. In general terms, all new plants should be watered immediately following the planting. Moving forward, soil moisture should be checked every 3 days for the next 4-6 weeks.
During spring and fall, when the temperatures are lower and there is more rain, plan on watering 1-2 times per week (or less!). Summer plantings may require watering 2-3 times per week (or more!). Your plants must receive a minimum of 1” of rain before a watering can be skipped. Soil moisture levels, especially during sunny or windy weather, should be checked 1-3 times per week until your plants are established.
Deciduous Trees
Research the species of tree! Different species of trees will require more or less water naturally. It is good to know if your particular tree prefers wet soil (Birch, Willow), well-drained soil (Sugar Maple, Red Oak), or somewhere between. If your trees have flowers, they will need more water during their flowering cycle and should be checked more frequently during their flowering cycle.
The vast majority of a tree’s feeder roots are in the top 18” of soil. With your chosen watering tool (hose, watering wand, soak hose, root feeder) apply water to the root ball until the water bubbles up to the surface, or is pooling slightly and no longer being absorbed. If the water begins to run off immediately, the flow is excessive and the water pressure should be decreased. Trees on a slope need a catch basin to hold water until it soaks in.
A deep soak less often will encourage rooting into the surrounding soil. Checking the soil will tell you if too much, enough, or too little water is being given. Trees should be watered at least once per week; this process can take anywhere between 20 minutes to an hour, depending on the size and variety of the tree and the soil type. If you are having a hard time determining the moisture level of your soil by look and feel, it may be worth investing in a hydrometer!
Evergreens
Identify the species of Evergreen! Different species of evergreens will require more or less water naturally. It is good to know if your particular tree prefers wet soil (Arborvitae), or well-drained soil (Juniper, Blue Spruce), or somewhere between!
With your chosen watering tool (hose, watering wand, soak hose) apply water to the root ball until the water is pooling at the surface and not quickly draining down into the soil anymore. If the water begins to run off, the flow is excessive, and the water pressure should be decreased. Evergreens on a slope need a catch basin to hold water until it soaks in.
A deep soak less often will encourage rooting into the surrounding soil. Checking the soil will tell you if too much, enough, or too little water is being given. Trees should be watered at least once per week. This process can take anywhere between 20 minutes and an hour, depending on the size and variety of the tree and the soil type. If you are having a hard time determining the moisture level of your soil by look and feel, it may be worth investing in a hydrometer!
Be sure to water your evergreens in the fall. Also, it is especially essential to thoroughly water all newly planted evergreens. If Evergreens do not have sufficient water in their plant tissues, their needles will be more prone to turning brown when exposed to winter sun and wind. They also have a much better survival rate if they go into winter with a reserve of water, as they continue to lose water from their needles on warm winter days.
Shrubs
Learn about your shrubs! Different species of shrubs will have varying watering preferences. Flowering shrubs will require more water than average during their flowering cycle.
With your chosen watering tool (hose, watering wand, soak hose) apply water to the root zone until the water bubbles up to the surface and is no longer soaking down.
Soaker hoses or watering wands are best. Sprinklers can be used, but are best used early morning. Wetting the leaves in the mid-day summer heat can lead to unsightly leaf spots due to burning (water droplets acting as a magnifier), and watering in the evening can prevent the plant from drying out, aiding in fungal issues.
A deep soak less often will encourage rooting into the surrounding soil. Checking the soil will tell you if too much, enough, or too little water is being given. Shrubs should be watered at least once per week; this process can take anywhere between 15 minutes to 30 minutes, depending on the size and variety of shrubs and the soil type. If you are having a hard time determining the moisture level of your soil by look and feel, it may be worth investing in a hydrometer!
Mixed Planting Beds
Discover the plants in your mixed planting beds! The basic categories of plantings are trees, evergreens, shrubs, and perennials. Different plants and groups of plants require varying watering needs.
With your chosen watering tool (hose, watering wand, soak hose, sprinkler) apply water to the planting beds. If using a watering wand and/or hose, target the individual plants as described above in the shrub/perennial/tree sections.
Soak hoses, in-ground irrigation, or drip irrigation systems are ideal for mixed planting beds. These tools can thoroughly soak the entire bed, often utilizing a timer for convenience. Hoses and watering wands are a great alternative, but a bit more time-consuming. Please see deciduous trees/shrubs/perennial sections for information on how to water these plants by hand.
Sprinklers can be used, but are best used early morning. Wetting the leaves in the summer heat can lead to unsightly leaf spots due to burning (water droplets acting as a magnifier), and watering in the evening can lead to excess moisture sitting on the leaves, aiding in fungal issues. If using a sprinkler, deliver approximately 1” of water per session. This can be measured with a rain gauge or by placing a cup under the flow until 1” of water is observed in the container. Repeat 1-3 times per week, depending on weather and soil condition,s as mentioned in the guidelines and new planting sections.
Mixed planting beds should be watered at least once per week. If you are having a hard time determining the moisture level of your soil by look and feel, it may be worth investing in a hydrometer! Be sure to check your planting beds in many areas to see if some spots are drying out faster than others.
Lawns
The best time to water is from sundown to sunup. Watering during the day, especially if it’s sunny and windy can waste 50% or more of the water. Avoid watering walks, drives and other paved surfaces – this is wasted water!
In-ground automatic systems, when properly designed and installed with weather or soil moisture sensors, will apply the correct amount of water each week- saving you the time and trouble of setting up sprinklers and turning them on and off. In-ground systems also avoid overspray onto walks, drives and streets.
There are also many practices you can implement to reduce water requirements. Cut you lawn at a higher level (we recommend 3”), aerate you lawn every fall or every other fall (this will increase the water infiltration rate and provide a less compact root zone). Be sure to keep your lawn fertilized properly as this promotes not only top growth but also root growth. And, don’t wait until you lawn is brown and dormant to start irrigating – the soil is like a sponge – once it is dry it will take more water to bring it back.
Mulches can reduce soil temperature extremes, help control weeds and improve the appearance of your plants. Most mulch material should be 2-4 inches deep. Excessive mulch can interfere with the oxygen supply to the roots of some plants.
Many organic materials can be used as mulches including shredded bark, wood or bark chips, cocoa or grain hulls, and pine needles. Organic mulches are natural in appearance and add organic matter to the soil as they decompose.
Some inorganic materials that are used for mulching include crushed stone or washed stone. Weed barrier fabric is used below the stone mulches to keep the soil from washing up to the surface of the bed.
Perennials
Get to know your perennials! Different species of perennials have different watering preferences. Perennials will require more water than average during their bloom cycle.
With your chosen watering tool (hose, watering wand, soak hose, sprinkler), apply water directly at the base of the plant. It is best practice to water perennials at ground level and avoid the leaves as much as possible.
Soak hoses, in-ground irrigation, or drip irrigation systems are ideal for perennial beds. These tools can thoroughly soak the entire bed, often utilizing a timer for convenience. Hoses and watering wands are a great alternative, but a bit more time-consuming.
Sprinklers can be used, but are best used early morning. Wetting the leaves mid-day in the summer heat can lead to unsightly leaf spots due to burning (water droplets acting as a magnifier), and watering in the evening can lead to excess moisture sitting on the leaves, aiding in fungal issues. If using a sprinkler, deliver approximately 1” of water per session. This can be measured with a rain gauge or by placing any water-tight container under the water until 1” of water is observed in the container. Repeat 1-3 times per week, depending on weather and soil conditions as mentioned in the guidelines and new planting sections.
Perennial beds should be watered 1-3 times per week, depending on the weather and soil type, as mentioned in the guidelines/new plantings. Perennials require shallower and more frequent watering as compared to larger plants such as trees and shrubs. If you are having a hard time determining the moisture level of your soil by look and feel, it may be worth investing in a hydrometer! Be sure to check your planting beds in many areas to see if some spots are drying out faster than others.